Djangoのカスタムユーザーモデルでサインアップできるようにする

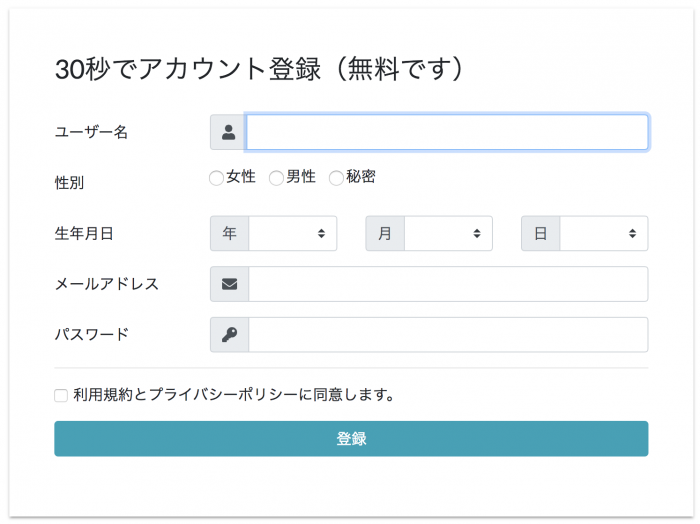
Django既存のUserモデルを拡張したカスタムユーザーモデルに加え、一意のユーザーにひもづくProfileモデルを用意し、下図のようなフォームでサインアップができるようにしました。

モデルの拡張やビューの設定など、確実に忘れるのでメモします。
Table of Contents
モデルの作成
カスタムユーザーモデル
models.pyファイルにて、AbstractBaseUserを継承する形でカスタムユーザーモデルを用意しました。ユニークなメールアドレスを登録できるようにしています。
from django.db import models
from django.contrib.auth.models import AbstractBaseUser, PermissionsMixin, BaseUserManager

class UserManager(BaseUserManager):
    def create_user(self, username, email, password=None):
        if not username:
            raise ValueError('Users must have an username')
        elif not email:
            raise ValueError('Users must have an email address')

        user = self.model(
            username = username,
            email = self.normalize_email(email),
        )
        user.set_password(password)
        user.save(using=self._db)
        return user

    def create_superuser(self, username, email, password):
        user = self.create_user(
            username,
            email,
            password=password,
        )
        user.is_admin = True
        user.save(using=self._db)
        return user

class User(AbstractBaseUser, PermissionsMixin):
    username = models.CharField(max_length=30, unique=True)
    email = models.EmailField(unique=True)
    first_name = models.CharField(max_length=30, blank=True)
    last_name = models.CharField(max_length=30, blank=True)
    is_staff = models.BooleanField(default=False)
    is_active = models.BooleanField(default=True)
    date_joined = models.DateTimeField(auto_now_add=True)

    objects = UserManager()

    EMAIL_FIELD = 'email'
    USERNAME_FIELD = 'username'
    REQUIRED_FIELDS = []
class UserManager(BaseUserManager):
AbstractBaseUserを拡張する場合、 create_user と create_superuser メソッドを定義しているUserManagerというクラスも修正する必要があります。 create_user はその名の通り、ユーザーの新規作成時に呼び出されるメソッドです。 create_superuser は管理者用のユーザーを作成するときに使われるメソッドですね。
objects = UserManager()
Userクラスの中にある objects という変数は、views.pyなどでUserモデルの情報を参照するときに使います。例えばこんな感じ↓
user = User.objects.get(username="Sakamoto")
↑はSakamotoという名前のユーザーをUserモデルから探し、その情報をuser変数につっこんでいます。
Profileモデル
上記カスタムUserモデルに加えて、Profileというモデルを用意しました。
ユーザーの新規登録と同期して、登録されたユーザーにひもづくProfileレコードが挿入されます。
from django.db.models.signals import post_save
from django.dispatch import receiver

class Profile(models.Model):
    user = models.OneToOneField(User, on_delete=models.CASCADE)
    gender = models.CharField(max_length=20, blank=True)
    birth_date = models.DateField(null=True, blank=True)
    location = models.CharField(max_length=30, blank=True)
    favorite_words = models.CharField(max_length=50, blank=True)

@receiver(post_save, sender=User)
def create_user_profile(sender, instance, created, **kwargs):
    if created:
        Profile.objects.create(user=instance)

@receiver(post_save, sender=User)
def save_user_profile(sender, instance, **kwargs):
    instance.profile.save()
signals、post_save、receiver
同期にはsignalsというモデルのpost_saveというモジュールと、receiverというモジュールを使います。
Userモデルのpost_saveシグナルをreceiverで受け取り、 create_user_profile と save_user_profile メソッドが起動します。
フォームの作成
forms.pyを作ります。Djangoがデフォルトで用意している認証用のフォームもあるのですが、もう少しいい感じにしたかったので拡張しました。
SignUpForm
from django import forms
from django.contrib.auth.forms import UserCreationForm
from django.contrib.auth import get_user_model
User = get_user_model()
from .models import Profile
from datetime import datetime

class SignUpForm(UserCreationForm):
    password = forms.CharField(widget=forms.PasswordInput)
    password1 = forms.CharField(required=False)
    password2 = password1

    class Meta:
        model = User
        fields = ('username', 'email', 'password')

class ProfileForm(forms.ModelForm):
    CHOICES = (
        ('female', '女性',),
        ('male', '男性',),
        ('not_applicable', '秘密',)
    )
    gender = forms.ChoiceField(widget=forms.RadioSelect, choices=CHOICES, required=False)

    def make_select_object(from_x, to_y, dates, increment=True):
        if increment:
            for i in range(from_x, to_y):
                dates.append([i, i])
        else:
            for i in range(from_x, to_y, -1):
                dates.append([i, i])
        return dates

    def make_select_field(select_object):
        dates_field = forms.ChoiceField(
            widget=forms.Select,
            choices=select_object,
            required=False
        )
        return dates_field

    years = [["",""]]
    current_year = datetime.now().year
    years = make_select_object(current_year, current_year-80, years, increment=False)
    birth_year = make_select_field(years)

    months = [["",""]]
    months = make_select_object(1, 13, months)
    birth_month = make_select_field(months)

    days = [["",""]]
    days = make_select_object(1, 32, days)
    birth_day = make_select_field(days)

    class Meta:
        model = Profile
        fields = ('gender', 'birth_year', 'birth_month', 'birth_day')
class SignUpForm(UserCreationForm)
from django.contrib.auth.forms import UserCreationForm ここでインポートしたユーザー作成用のフォームを SignUpForm クラスへ継承しています。
password
UserCreationFormではpassword1とpassword2(確認用)の二つのフォームフィールドがありますが、二つもいらないと思ったので無効にしています。
class ProfileForm(forms.ModelForm)
Profileモデルのためのフォームをこのクラスで設定していて、性別と生年月日が取得できます。selectオブジェクトに色々制限があったりして、少し苦労しました。
ビューの作成
views.pyにて、サインアップ用のメソッドを定義します。ここではsign_upという名前にしました(そのまんまですね!)。urls.pyの設定も忘れずにね!
sign_upビュー
from django.shortcuts import render, redirect
from django.contrib.auth import authenticate, login as auth_login, get_user_model
from django.contrib import messages
from django.core.exceptions import ObjectDoesNotExist
from .forms import SignUpForm, ProfileForm
from .models import Profile
from datetime import date

User = get_user_model()

def home(request):
    return render(request, 'your_app/home.html')

def sign_up(request):
    if request.method == 'POST':
        signup_form = SignUpForm(request.POST)
        profile_form = ProfileForm(request.POST)
        if signup_form.is_valid() and profile_form.is_valid():
            username = signup_form.cleaned_data.get('username')
            email = signup_form.cleaned_data.get('email')
            password = signup_form.cleaned_data.get('password')
            gender = profile_form.cleaned_data.get('gender')
            birth_year = profile_form.cleaned_data.get('birth_year')
            birth_month = profile_form.cleaned_data.get('birth_month')
            birth_day = profile_form.cleaned_data.get('birth_day')

            user = User.objects.create_user(username, email, password)
            user.profile.gender = gender
            if birth_day and birth_month and birth_year:
                birth_date = date(int(birth_year), int(birth_month), int(birth_day)).isoformat()
                user.profile.birth_date = birth_date
            user.save()

            user = authenticate(request, username=username, password=password)
            auth_login(request, user, backend='django.contrib.auth.backends.ModelBackend')
            messages.add_message(request, messages.SUCCESS, 'ユーザー登録が完了しました!')
            return redirect('home')
    else:
        signup_form = SignUpForm()
        profile_form = ProfileForm()

    login_form = LoginForm()
    context = {
        'signup_form': signup_form,
        'profile_form': profile_form,
    }
    return render(request, 'registration/sign_up.html', context)
authenticate, login, get_user_modelモジュール
from django.contrib.auth import authenticate, login as auth_login, get_user_model でauthenticateとlogin、get_user_modelモジュールを呼び出しています。今回はカスタムユーザーを使うため、認証にget_user_modelを使う必要があります。
User = get_user_model() のところでget_user_model()をUserに代入していて、 user = User.objects.create_user(username, email, password) とかで使っています。
is_valid()
送信されたフォームの内容のバリデーションをいい感じにやってくれるメソッドです。
cleaned_data
is_valid()メソッドで検査された値はcleaned_dataに格納されます。フォームの値を取り出したいと時はrequest.POSTからは取得しないで、cleaned_dataから取るようにします。
User.objects.create_user
models.pyとviews.pyで定義したように、 User = get_user_model()、 objects = UserManager() となっていますので、最終的に UserManager クラスの create_user メソッドが呼ばれ、ユーザーが登録されます。また、先述した通り、このユーザーにひもづく形でProfileモデルにレコードが挿入されます。
auth_login(request, user, backend=‘django.contrib.auth.backends.ModelBackend’)
OAuth2認証など複数の認証方法をsettings.pyに追加している場合、backendに django.contrib.auth.backends.ModelBackend を指定する必要があります。
テンプレートの作成
registration/sign_up.html
{%!l(MISSING)oad widget_tweaks %!}(MISSING)
..........
<h3>30秒でアカウント登録(無料です)</h3>
<form action="{%!u(MISSING)rl 'sign_up' %!}(MISSING)" method="post">
  {%!c(MISSING)srf_token %!}(MISSING)

  <div class="form-group row">
    <label for="{{ form.username.id_for_label }}" class="col-sm-3 col-form-label">ユーザー名</label>
    <div class="col-sm-9">
      <div class="input-group">
        <div class="input-group-prepend">
          <div class="input-group-text"><i class="fas fa-user"></i></div>
        </div>
        {{ signup_form.username|add_class:'form-control' }}
        {%!f(MISSING)or error in signup_form.username.errors %!}(MISSING)
        <span class="text-warning">{{ error }}</span>
        {%!e(MISSING)ndfor %!}(MISSING)
      </div>
    </div>
  </div>
..........
  <div class="form-group row">
    <div class="col-sm">
      <button type="submit" class="btn btn-info btn-block">登録</button>
    </div>
  </div>
</form>
widget_tweaks
フォームのデザインを自由にいじれるように、widget_tweaksライブラリを使っています。widget_tweaksについては↓こちらの記事をどうぞ。
https://hodalog.com/how-to-use-bootstrap-4-forms-with-django/
signup_form.username|add_class:‘form-control’
views.pyのcontextに設定したsignup_formから、usernameのフォームに「form-control」というcssクラスをつけて出力しています。このcssクラスはBootstrapで使われるcssクラスです。
省略していますが、forms.pyに設定したそのほかのフォームフィールドについても同じような書き方で簡単に出力できます。
まとめ
Djangoの認証周りの設定はかなり自由にできるようになりました。やったね!